Learn everything about the Slump Cone Test, a key concrete workability test in construction. Discover its procedure, types, significance, and step-by-step guide to ensure quality control in concrete projects.
Concrete plays a crucial role in the construction industry, and ensuring its quality is essential for durable and safe structures. One key test used to assess the workability of fresh concrete is the Slump Cone Test. In this article, we’ll dive deep into the test, its procedure, significance, and practical applications in civil engineering.
What is the Slump Cone Test?
The slump cone test is a simple and widely used method to measure the workability or consistency of fresh concrete. It provides a quick check of the concrete’s fluidity, ensuring the mix is neither too stiff nor too fluid for the intended application. This test is crucial for maintaining quality control at construction sites and achieving desired structural performance.

Purpose of the Slump Cone Test
Why we do Slump Cone Test – The slump cone test is a crucial field and laboratory test in concrete construction to evaluate the consistency and workability of fresh concrete. It serves several objectives, ensuring the mix meets the specific requirements for construction applications:
Objectives of the Slump Cone Test:
- Ensuring Concrete Mix Suitability for Specific Applications:
- The slump cone test determines whether the concrete mix has the desired workability for its intended use.
- Different construction activities (e.g., slabs, beams, columns) require specific workability to ensure proper placement without segregation or excessive effort.
- Checking the Water-Cement Ratio Consistency:
- The test helps monitor the water-cement ratio, which directly influences the mix’s workability.
- A proper water-cement ratio ensures the required strength, durability, and performance of the hardened concrete.
- Maintaining Quality Control at Construction Sites:
- Regular testing ensures the concrete mix remains consistent throughout the project.
- Detects any deviations or inconsistencies in the mix, helping to identify issues such as excess water, inadequate mixing, or improper batching.
- Achieving Better Structural Performance:
- By ensuring the right workability and consistency, the test contributes to uniform compaction and eliminates voids within the structure.
- Proper workability reduces the chances of segregation or honeycombing, enhancing structural strength, durability, and load-bearing capacity.
In summary, the slump cone test plays a vital role in maintaining the quality, durability, and performance of concrete, ensuring it meets project-specific requirements and contributes to the longevity and safety of the structure.
Apparatus and Equipment
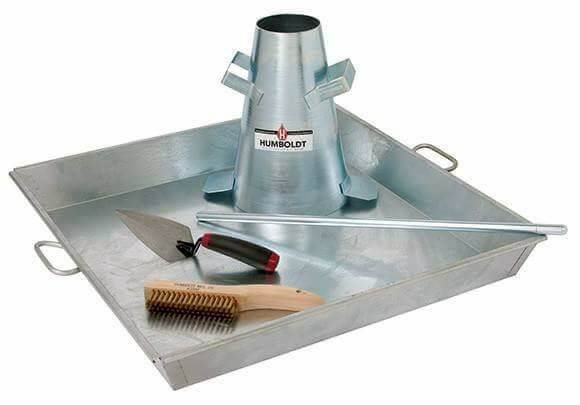
The apparatus required for conducting Slump test are Metallic Mould which is in the shape of frustum cone, A tamping rod with bullet end, Scale or tape for measuring the slump. Metallic sheet for placing Slump and trowel for pouring concrete in the slump. The following tools and equipment are required for the slump cone test:

- Slump Cone Mold: The mold for the test is in the form of the frustum of a cone having height 30 cm, bottom diameter 20 cm and top diameter 10 cm. A metallic mold in the shape of a frustum with dimensions:
- Height: 300 mm
- Bottom diameter: 200 mm
- Top diameter: 100 mm
- Tamping Rod: A 600 mm long steel rod with a 16 mm diameter, rounded at one end. The tamping rod is of steel 16 mm diameter and 60cm long and rounded at one end.
- Base Plate: A flat, rigid surface to support the cone.
- Measuring Scale / Tape: To measure the slump value accurately.
- Mixing and Handling Tools: For preparing and transporting the concrete mix.
- Metallic Sheet
- Trowel

Slump Cone Dimension
The standard slump cone (used in the slump test to measure the consistency of fresh concrete) has the following dimensions as per IS 1199:1959 (Indian Standard) and other international standards (e.g., ASTM C143):
Slump Cone Dimensions:
- Top Diameter (Smaller Opening): 100 mm (10 cm)
- Bottom Diameter (Larger Opening): 200 mm (20 cm)
- Height: 300 mm (30 cm)
- Thickness of Metal Sheet: 1.6 mm to 2.0 mm (for durability)
- Handles: Two handles attached to the sides for easy lifting.
- Foot Pieces (Optional): Base flanges or clamps to secure the cone while filling and compacting concrete.
Additional Accessories:
- Tamping Rod: A steel rod 16 mm in diameter and 600 mm long with a rounded end for compacting the concrete.
- Base Plate: A non-absorbent, rigid, and flat surface to conduct the test.
These dimensions are critical for ensuring uniformity and accurate results in the slump test. Let me know if you need more details or illustrations for this!
Step-by-Step Procedure
Follow these steps to perform the slump cone test:
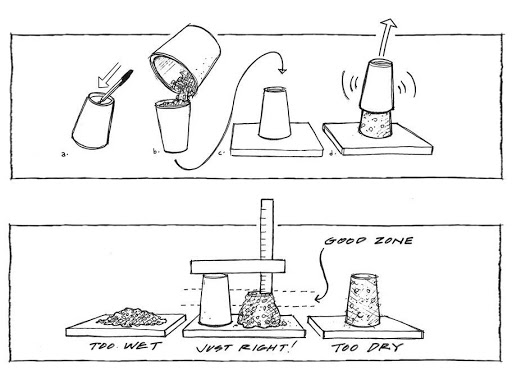
- Preparation: Ensure the apparatus is clean and free from moisture or debris. Place the slump cone on a flat, non-absorbent base.
- Filling the Cone: Fill the cone with freshly mixed concrete in three equal layers.
- Tamp each layer 25 times using the tamping rod, ensuring uniform compaction.
- Leveling the Surface: After filling, level the top surface of the cone using the tamping rod.
- Removing the Cone: Carefully lift the cone vertically upward without disturbing the concrete.
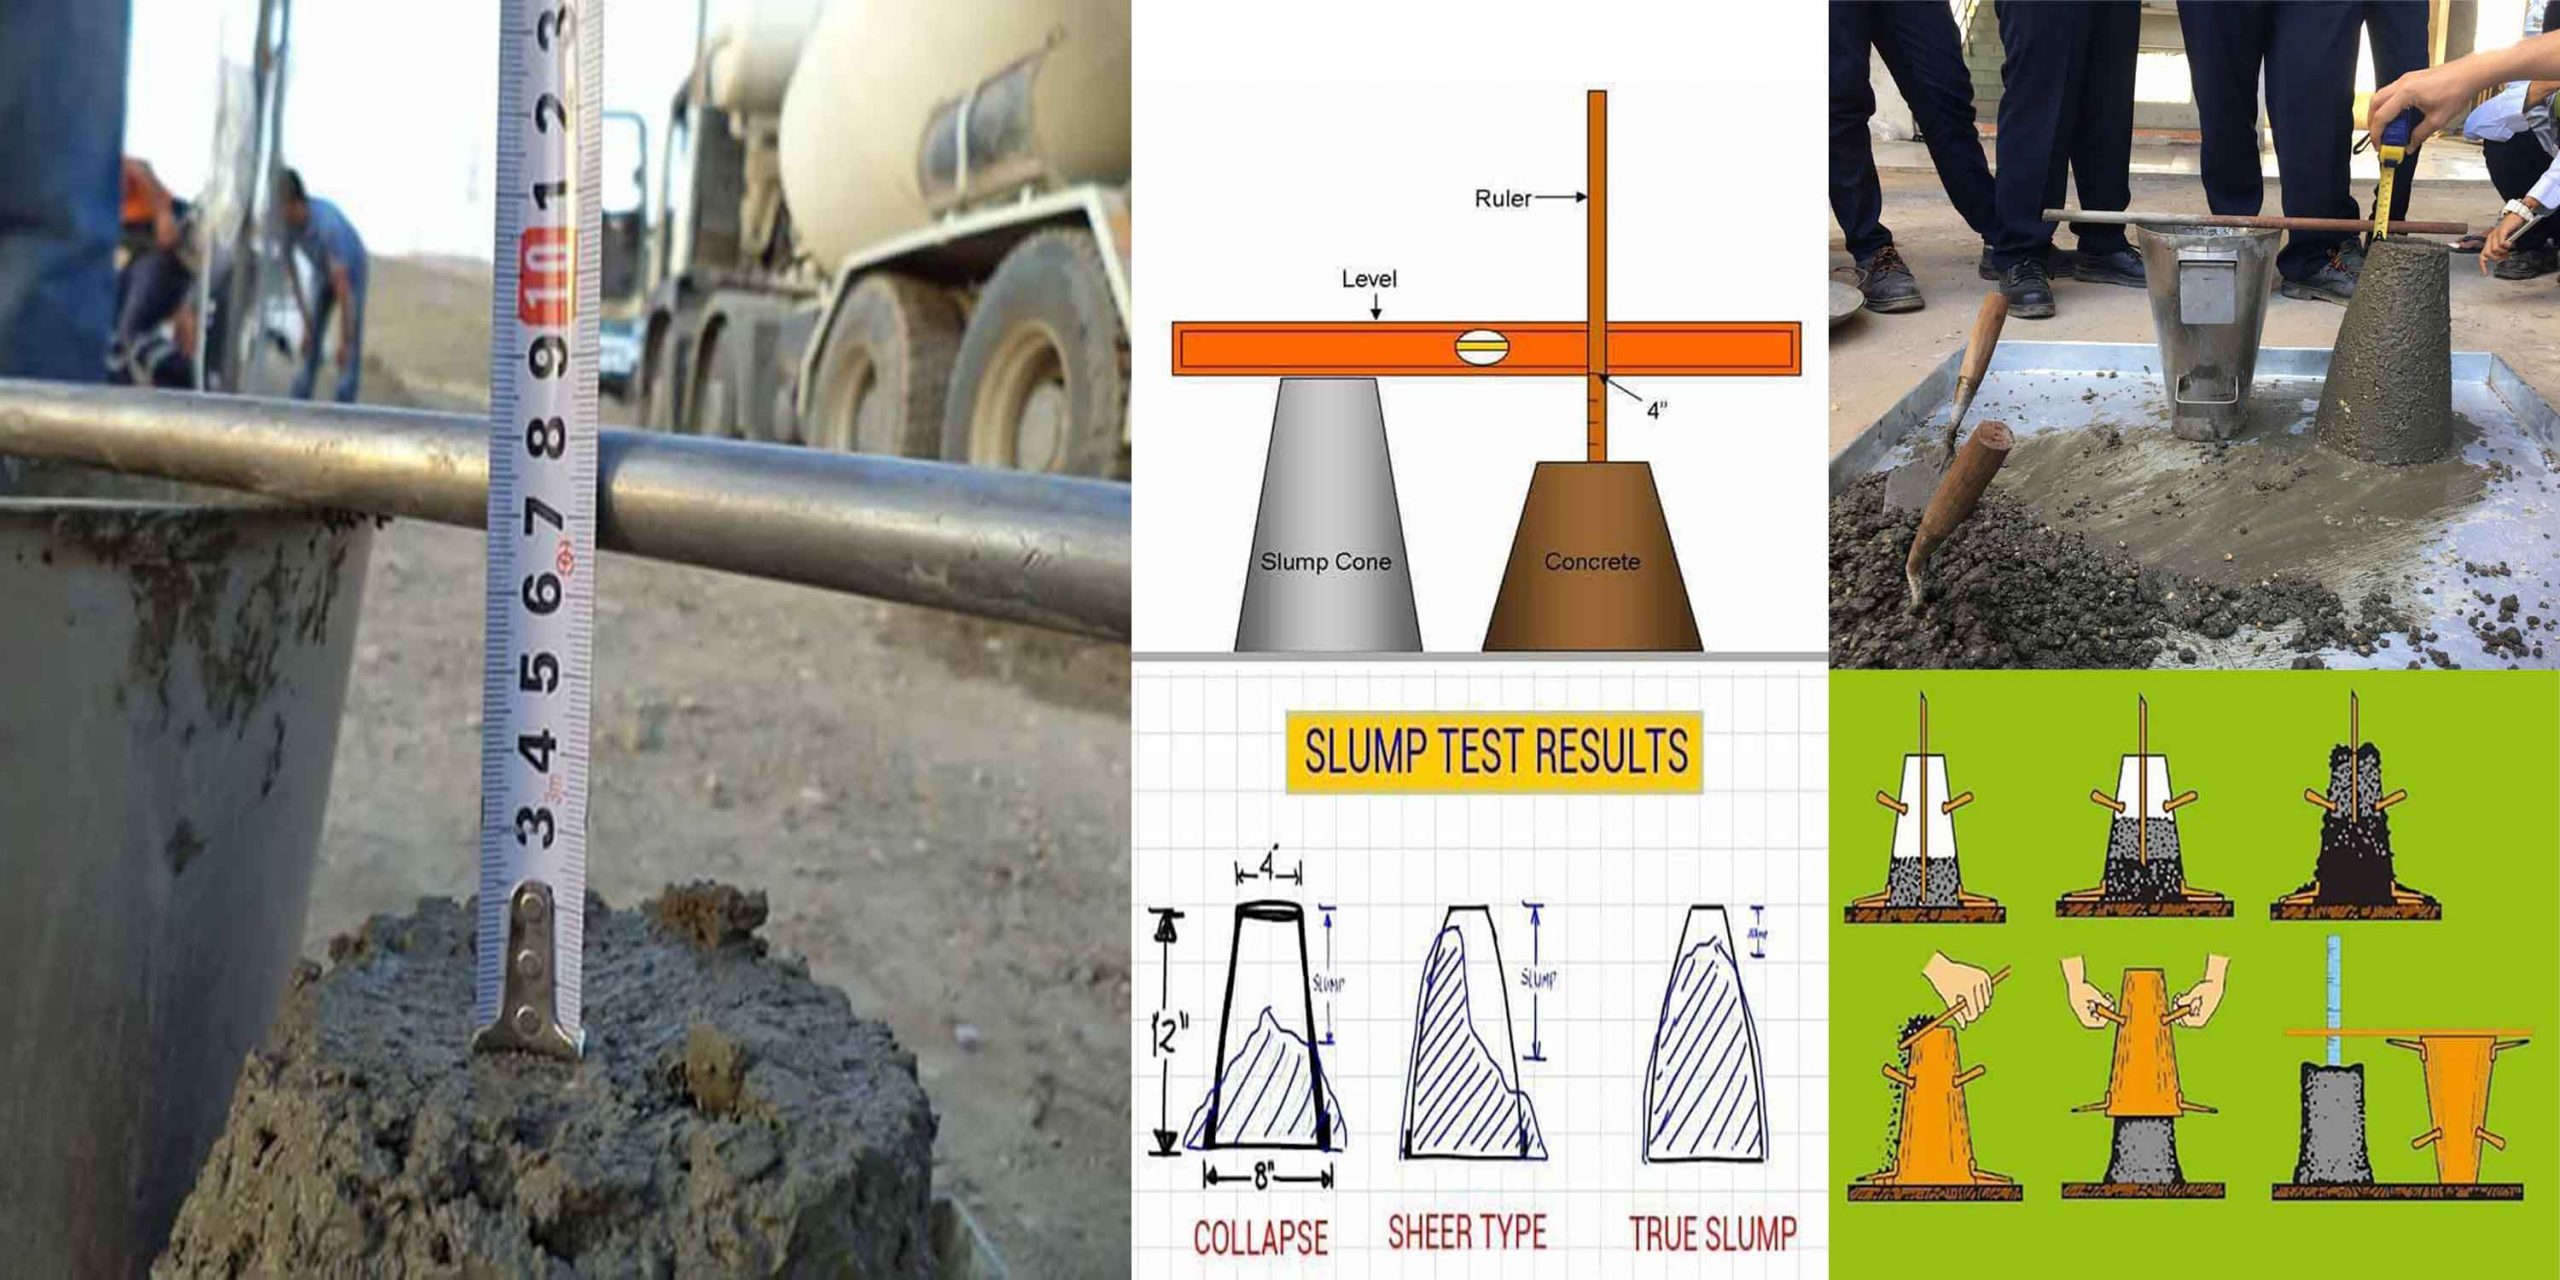
- Measuring the Slump: Measure the difference between the height of the cone and the highest point of the concrete using a measuring scale. This value is the slump.
Types of Slump
Slump tests are a simple and widely used method to assess the consistency and workability of fresh concrete. The test helps determine how easily concrete can be mixed, placed, and compacted, and it identifies any issues in the mix. The test results fall into three main categories: true slump, shear slump, and collapse slump, each indicating specific characteristics of the concrete mix.
1. True Slump
- Description: The concrete retains its original shape after the slump cone is removed, and the slump is uniform across the mass. The height reduction of the cone is measured as the slump.
- Significance:
- Indication: Indicates a well-designed and workable concrete mix with good cohesion.
- Application: Used for most general construction applications where workability and stability are critical, such as beams, slabs, and columns.
- Potential Issues: None if within the target slump range, but lower slumps could indicate insufficient water or improper mix design.
2. Shear Slump
- Description: The concrete slumps unevenly, tilting or shearing to one side after the cone is removed.
- Significance:
- Indication: Indicates poor cohesion in the concrete mix. It suggests that the mix may segregate or have uneven water distribution.
- Application: Not ideal for use in critical structural components due to potential segregation risks.
- Potential Issues:
- Mix might lack sufficient fine aggregates or cement.
- Could result in non-uniform strength and durability.
3. Collapse Slump
- Description: The concrete collapses completely upon removal of the cone, losing all shape and spreading excessively.
- Significance:
- Indication: Suggests that the mix has excessive water content, making it highly fluid.
- Application: Common in highly flowable concrete mixes, such as self-consolidating concrete (SCC) or mixes for heavily reinforced sections where high workability is essential. However, this must be intentional.
- Potential Issues:
- If unintended, it indicates over-watering, poor mix design, or improper use of admixtures.
- Can lead to reduced strength, segregation, and durability problems.
Summary of Potential Issues:
- True Slump: Well-designed mix; check if slump matches the desired range.
- Shear Slump: May lead to segregation or uneven concrete properties.
- Collapse Slump: Often indicates excessive water, compromising strength.
By understanding these slump types, engineers can quickly assess the concrete’s workability and identify potential mix issues before placement.
Recommended Slump Values
The acceptable slump value varies depending on the type of construction work. Below is a general guideline:
| Application | Recommended Slump (mm) |
|---|---|
| Foundations | 25-75 |
| Slabs and Beams | 75-125 |
| Columns | 75-150 |
| Pavements | 20-50 |
Note that these values may vary based on project specifications and standards.
Precautions and Common Mistakes
To ensure accurate results, follow these precautions:
- Use clean, dry equipment.
- Perform the test on a stable and level surface.
- Tamp each layer uniformly without over-compaction.
- Avoid delays between mixing and testing.
Common mistakes include improper tamping, uneven lifting of the cone, or performing the test on an uneven surface.
Factors Influencing Slump Values
Several factors can affect the slump test results, including:
- Water-Cement Ratio: Higher water content increases slump.
- Aggregate Properties: Size, shape, and texture of aggregates impact workability.
- Admixtures: Plasticizers or superplasticizers can alter the slump.
- Temperature: High temperatures may reduce slump due to faster setting.
Limitations of the Slump Cone Test
While the slump cone test is widely used, it has some limitations:
- It is not suitable for very stiff or highly fluid mixes.
- It only provides an approximate measure of workability, not exact flowability.
- Alternative tests like the flow table test or compaction factor test may be needed for specific scenarios.
Applications in Civil Engineering
The slump cone test is commonly used in:
- Quality Control: Ensuring consistent concrete properties on-site.
- Concrete Mix Design: Evaluating and optimizing mix proportions.
- Large-Scale Projects: Maintaining uniformity in concrete batches for dams, bridges, and high-rise buildings.
The slump cone test is a simple yet effective method to evaluate the workability of fresh concrete. By performing this test, civil engineers can ensure that the concrete mix meets the desired quality and consistency, leading to durable and safe structures. Though it has some limitations, its ease of use and practicality make it an indispensable tool in construction.